Quickstart Guide
Embarking on your journey into game development is an exciting endeavor, and we’re thrilled to accompany you as you explore the endless possibilities within Uni-verse Studio. Whether you’re a seasoned developer seeking a new platform or a newcomer eager to dive into the world of game creation, this guide is designed to equip you with the fundamental knowledge and skills to kickstart your game development journey.
In this comprehensive guide, we’ll walk you through the essential steps to get started with Uni-verse Studio by developing a simple game. By the end of this guide, you’ll have a solid understanding of the core features and workflows within Uni-verse Studio, enabling you to confidently embark on your game development projects with enthusiasm and proficiency.
So, without further ado, let’s dive in and unlock the exciting world of game development with Uni-verse Studio!
Requirements
There is one requirement for this guide, and that is the Uni-verse Studio itself! Please follow the instructions in Installing Uni-verse Studio to install the latest version of Uni-verse Studio, and double-click on the shortcut on your desktop to start developing your first project.
Creating the project
When you first start Uni-verse Studio, the login page will welcome you. If you already have an account, go ahead and type in your details to login. If you don’t have one, follow the instructions on the screen to create a new one, and then login with your account.
After logging in, click the “New project” button in Uni-verse Project Explorer to start creating your first game. Give a name to your game and then click “OK”. In this instance, we named our game “My awesome game”.
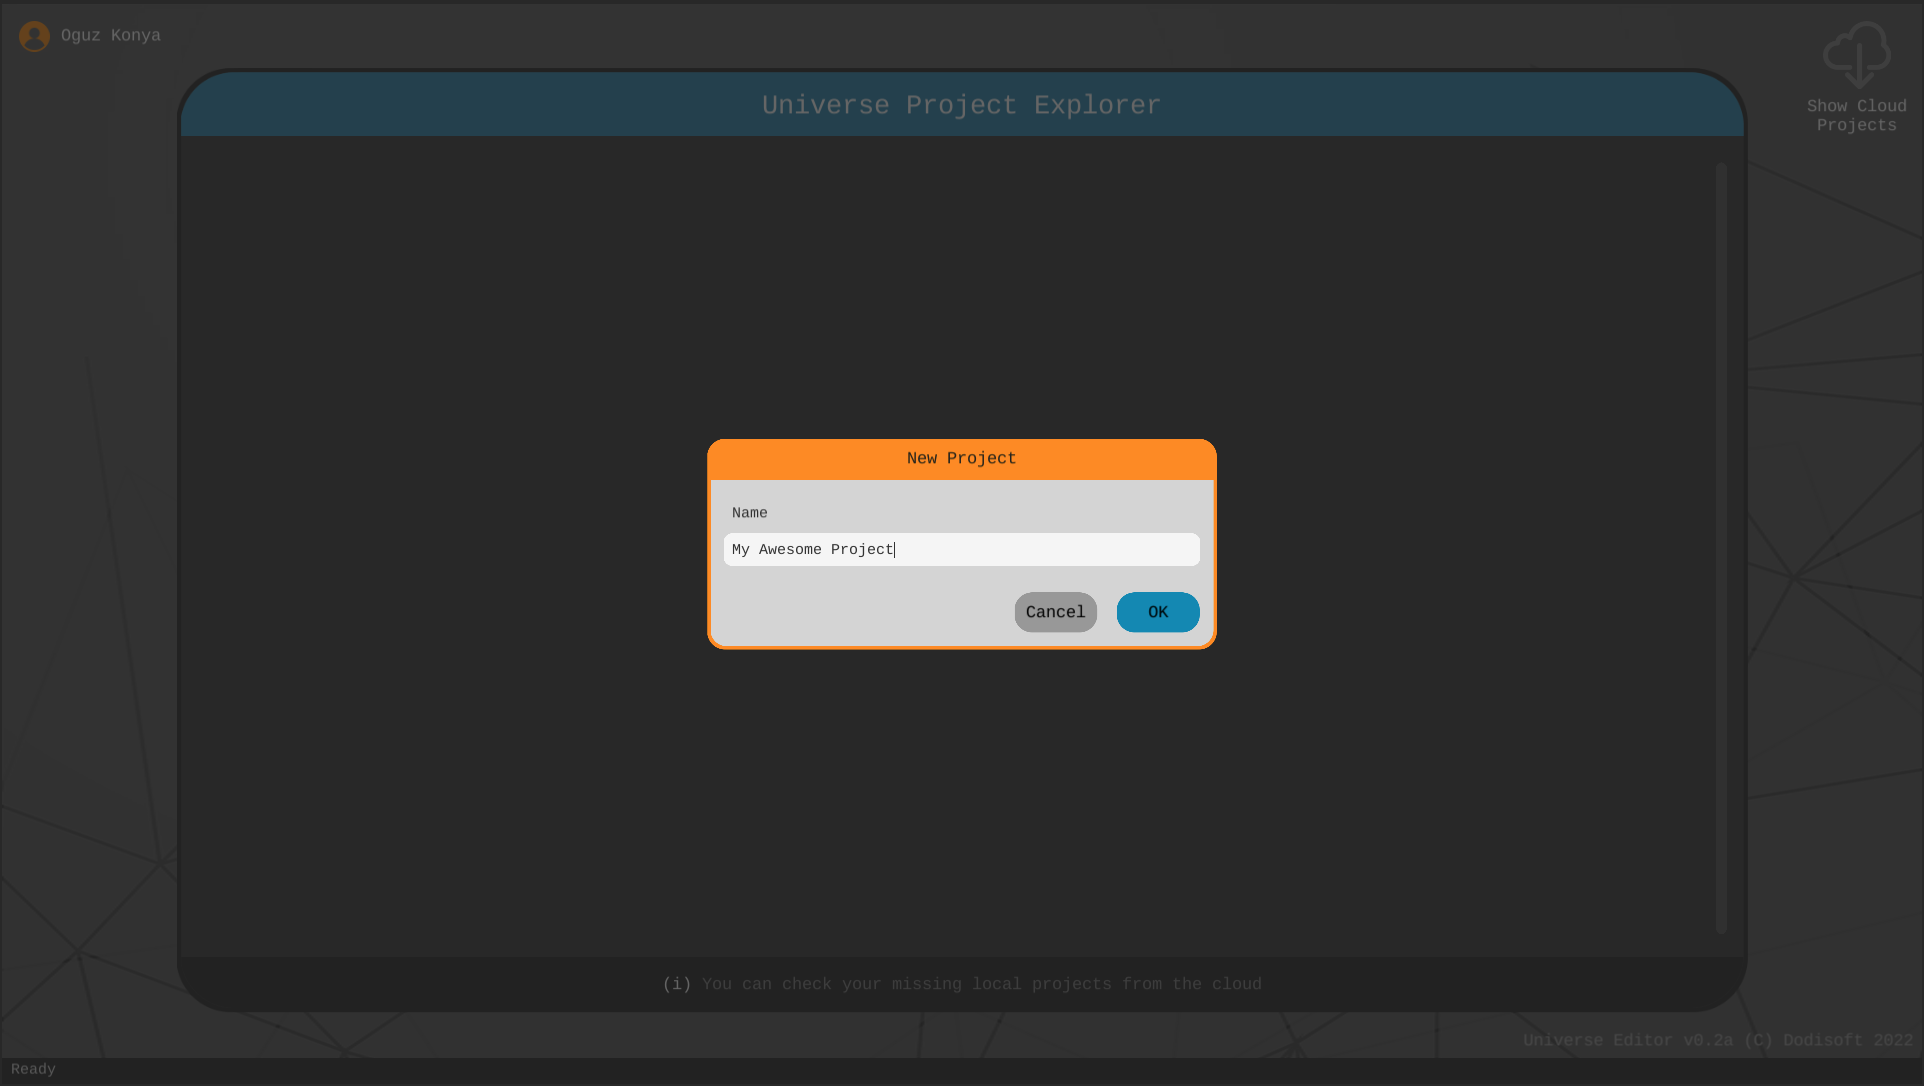 New project window
Importing the essentials
Uni-verse Studio provides unlimited freedom to developers but that freedom comes with a cost: when you first create your project, it will be completely empty and you will need to download your assets manually. But fret not! This step is very simple:
- Open the Store
- Search for “Framework” and import the latest version
- Search for “Helper scripts” and import the latest version
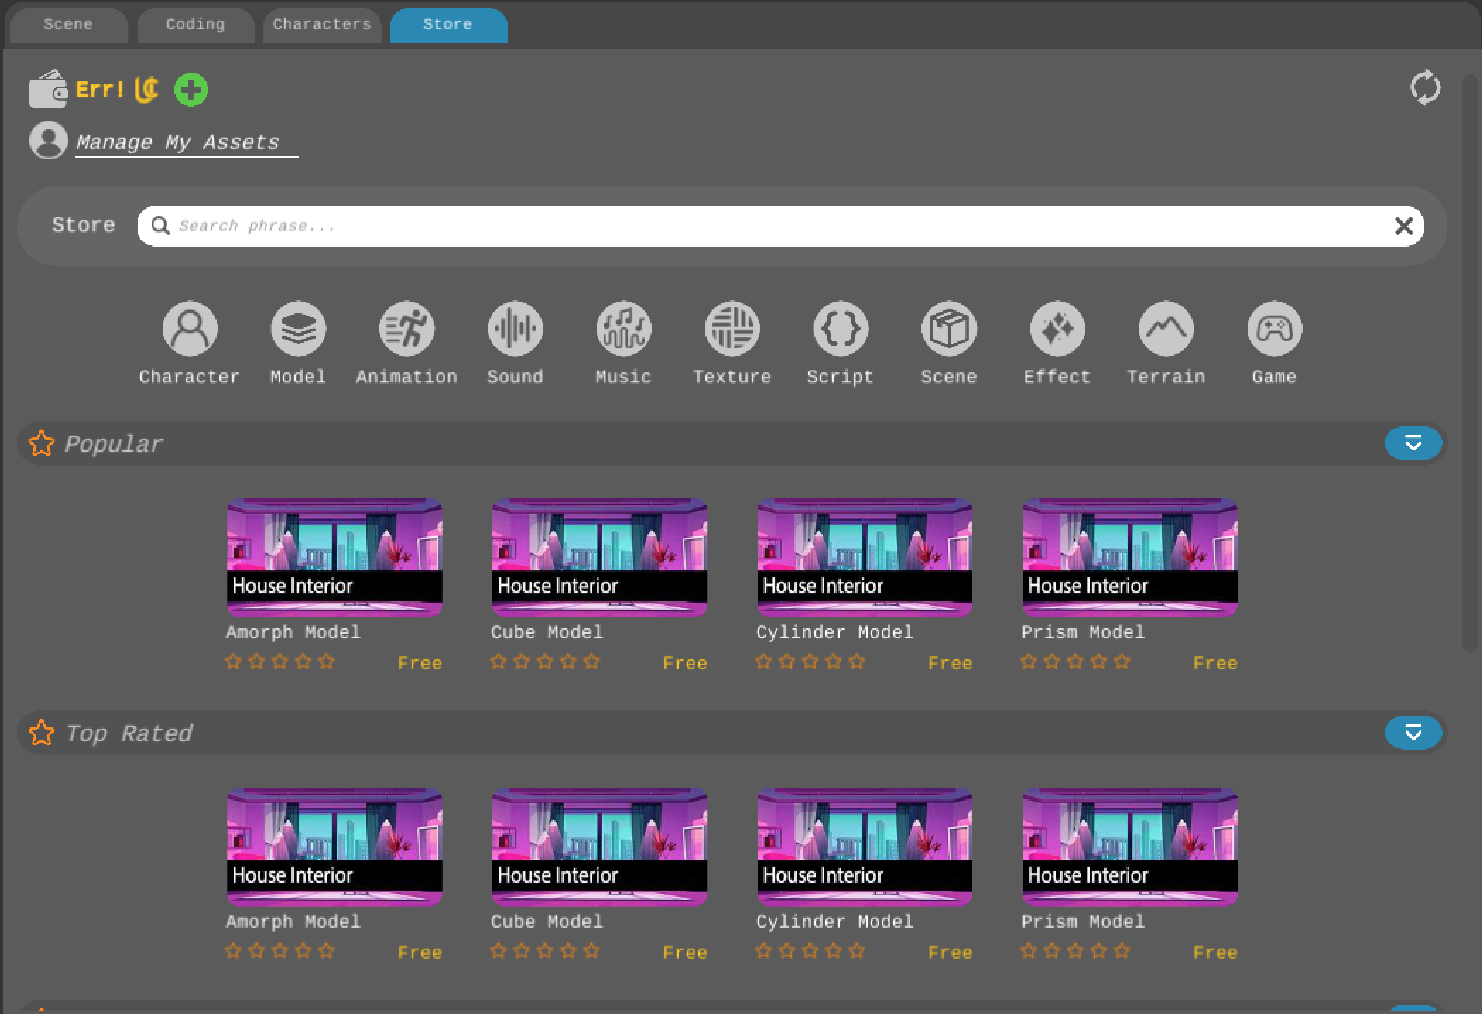 Asset store
You are half-way there already! With these packages imported, you can code your game but you are still missing assets. Luckily, you now know how to do that:
- Open the Store
- Search for “Primitives” and import the latest version
- Search for “Cube” and import the latest version
- Search for “Sphere” and import the latest version
- Search for “Amorph” and import the latest version
Now that we have everything to create our game, we can move on to the fun part!
Creating the game scene
A scene contains the game objects to interact with in a game. Let’s create that first:
- Right click in the Project component and click “New scene”
- Name your scene something cool, like “Main”
- Double click on your scene to open it
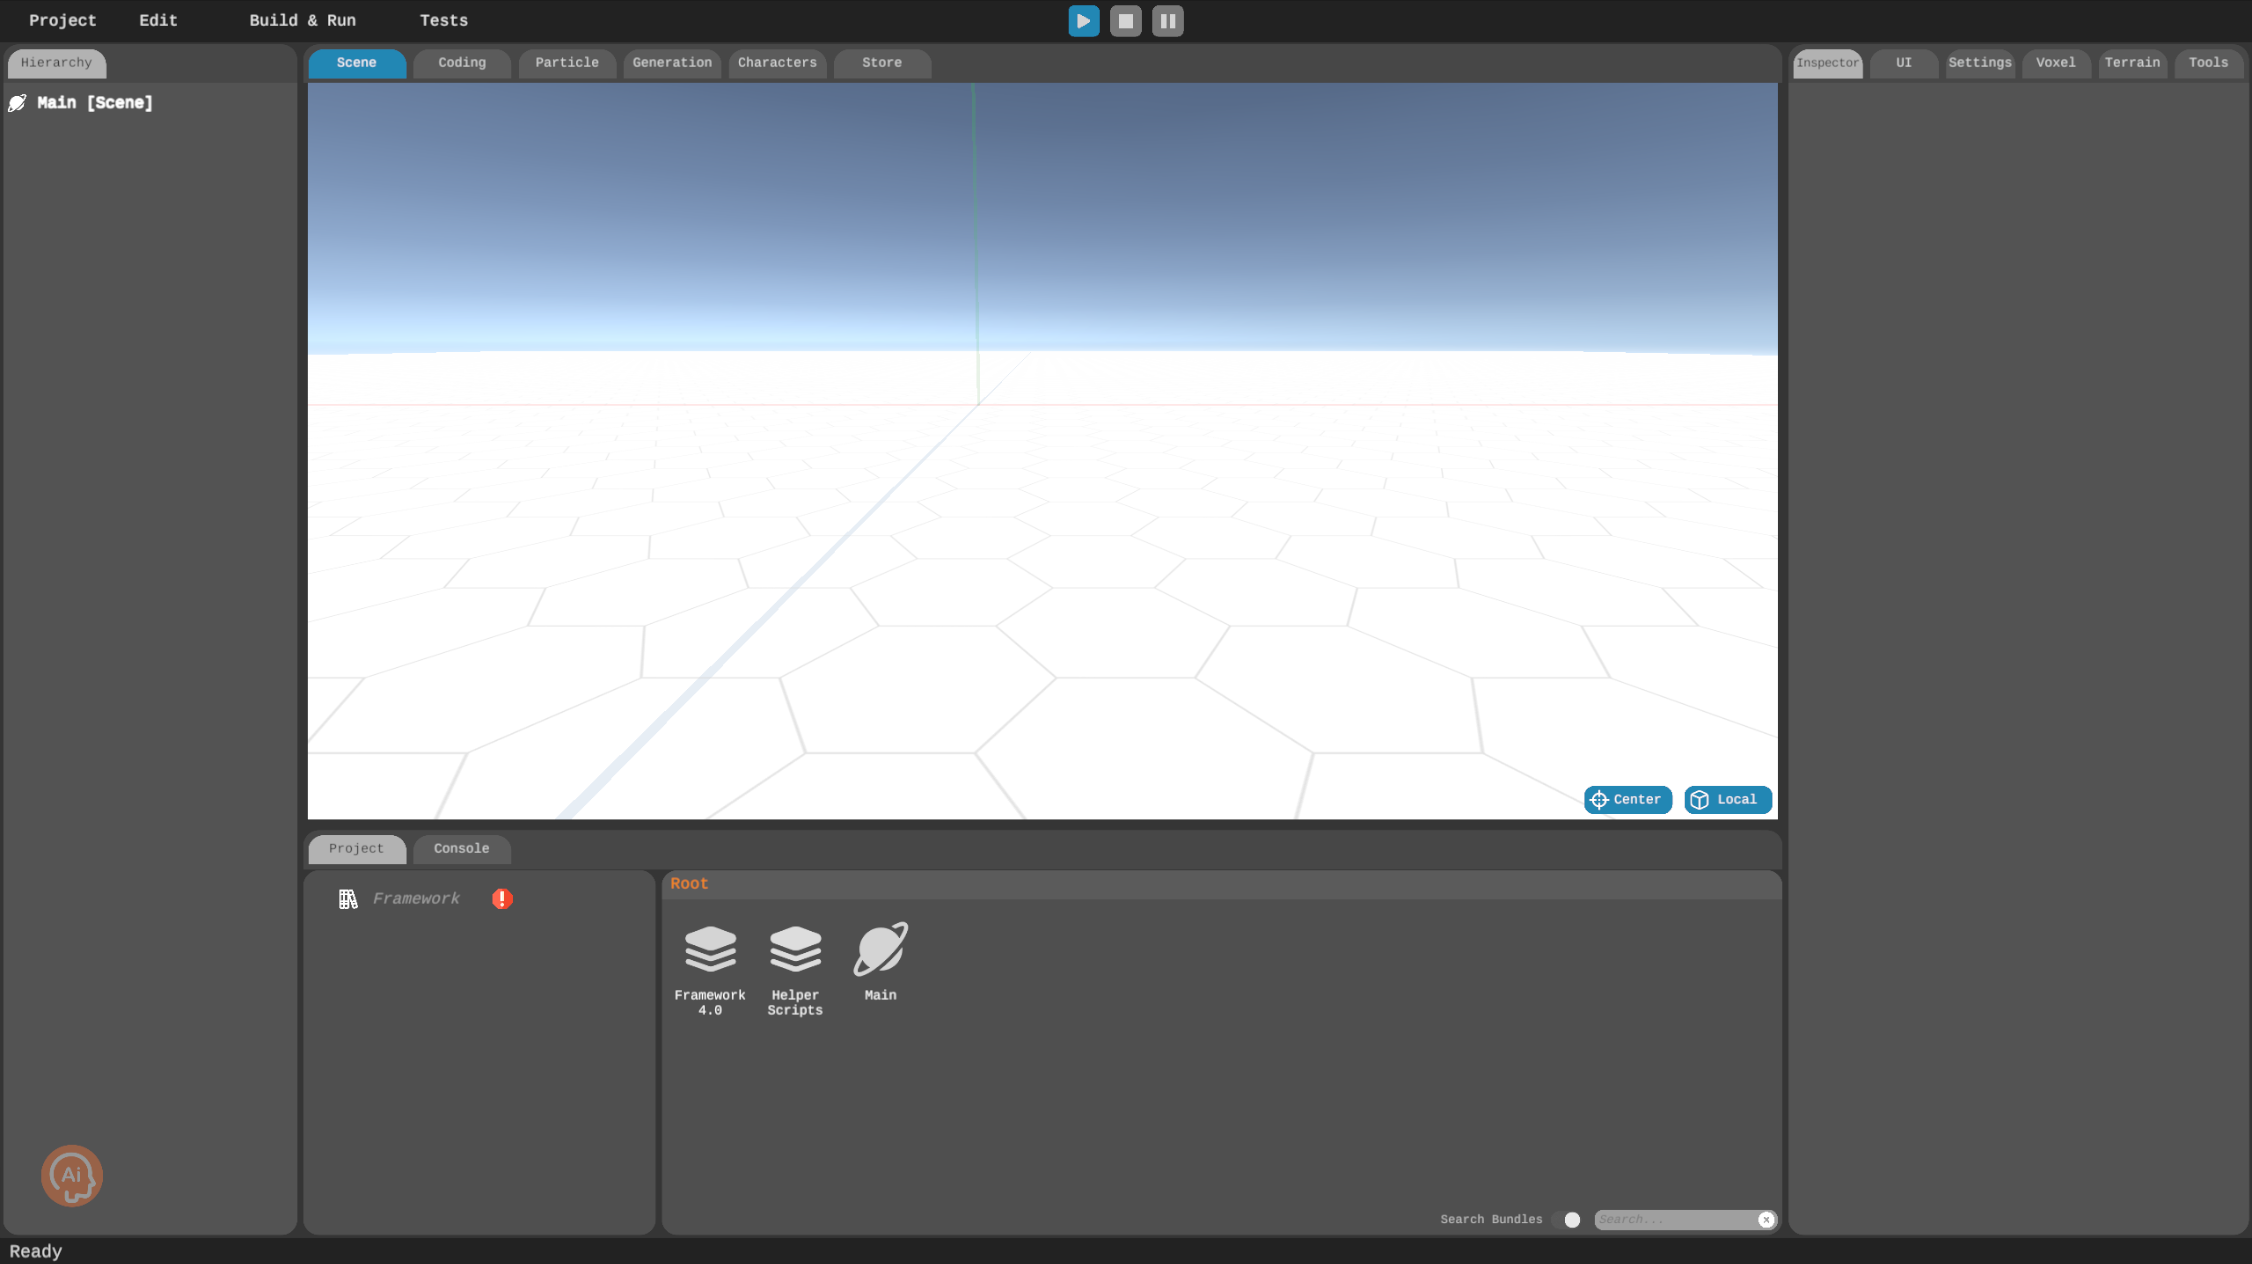 Your first scene. Look how empty but full of opportunities it is
This sets your scene as the active scene and you can see it in the Scene component.
Lights, camera, and ACTION!
We have a scene, but it doesn’t have a camera! Which means even though we can see what’s in there in the editor, the players won’t be able to see anything. So let’s add a camera for the players:
- Right click in the Hierarchy component and click “Create Empty”
- Name this new game object “Camera”
- In the inspector panel, click “Attach script”, and then search for “Camera” and click “Attach script”
- Now set FOV to 20, and position to (0, 3, -20)
 Right click in the Hierarchy to create an empty object
A camera alone can’t capture magic — lights make all the difference!
- In the Hierarchy panel, right-click and choose “Create Empty”
- Give this new object the name “Light”
- Over in the Inspector panel, click on “Attach Script”
- Type “Light” in the search bar and attach the script
- Set the position to (0, 5, -6)
- Adjust the rotation to (75, 0, 0)
- Change the light type to “Directional”
- Lastly, turn off the shadows for this light
Let’s get some ground…
In this game, the player will fire bullets at falling rocks to split them into two until they are completely destroyed. The undestroyed rocks will bounce off the ground. To do that, we need, well, a ground. A cube can do the job for now:
- Double click on Bundles, and then double click on Cube Model
- Click on Cube and drag and drop it on to the scene
- Rename it to “Ground” by right-clicking on your cube in the Hierarchy component, and clicking “Rename”
- Also tag it as “Ground” in the Inspector
- Now scale it in the Inspector as such so that it looks more like a ground:
- X: 20, Y: 0.1, Z: 5
- And make sure your Ground is at (0, 0, 0)
- Attach the “Box Collider” script to the ground.
- Set the collider size to (1, 1, 1).
- Set the center to (0.5, 0.5, 0.5).
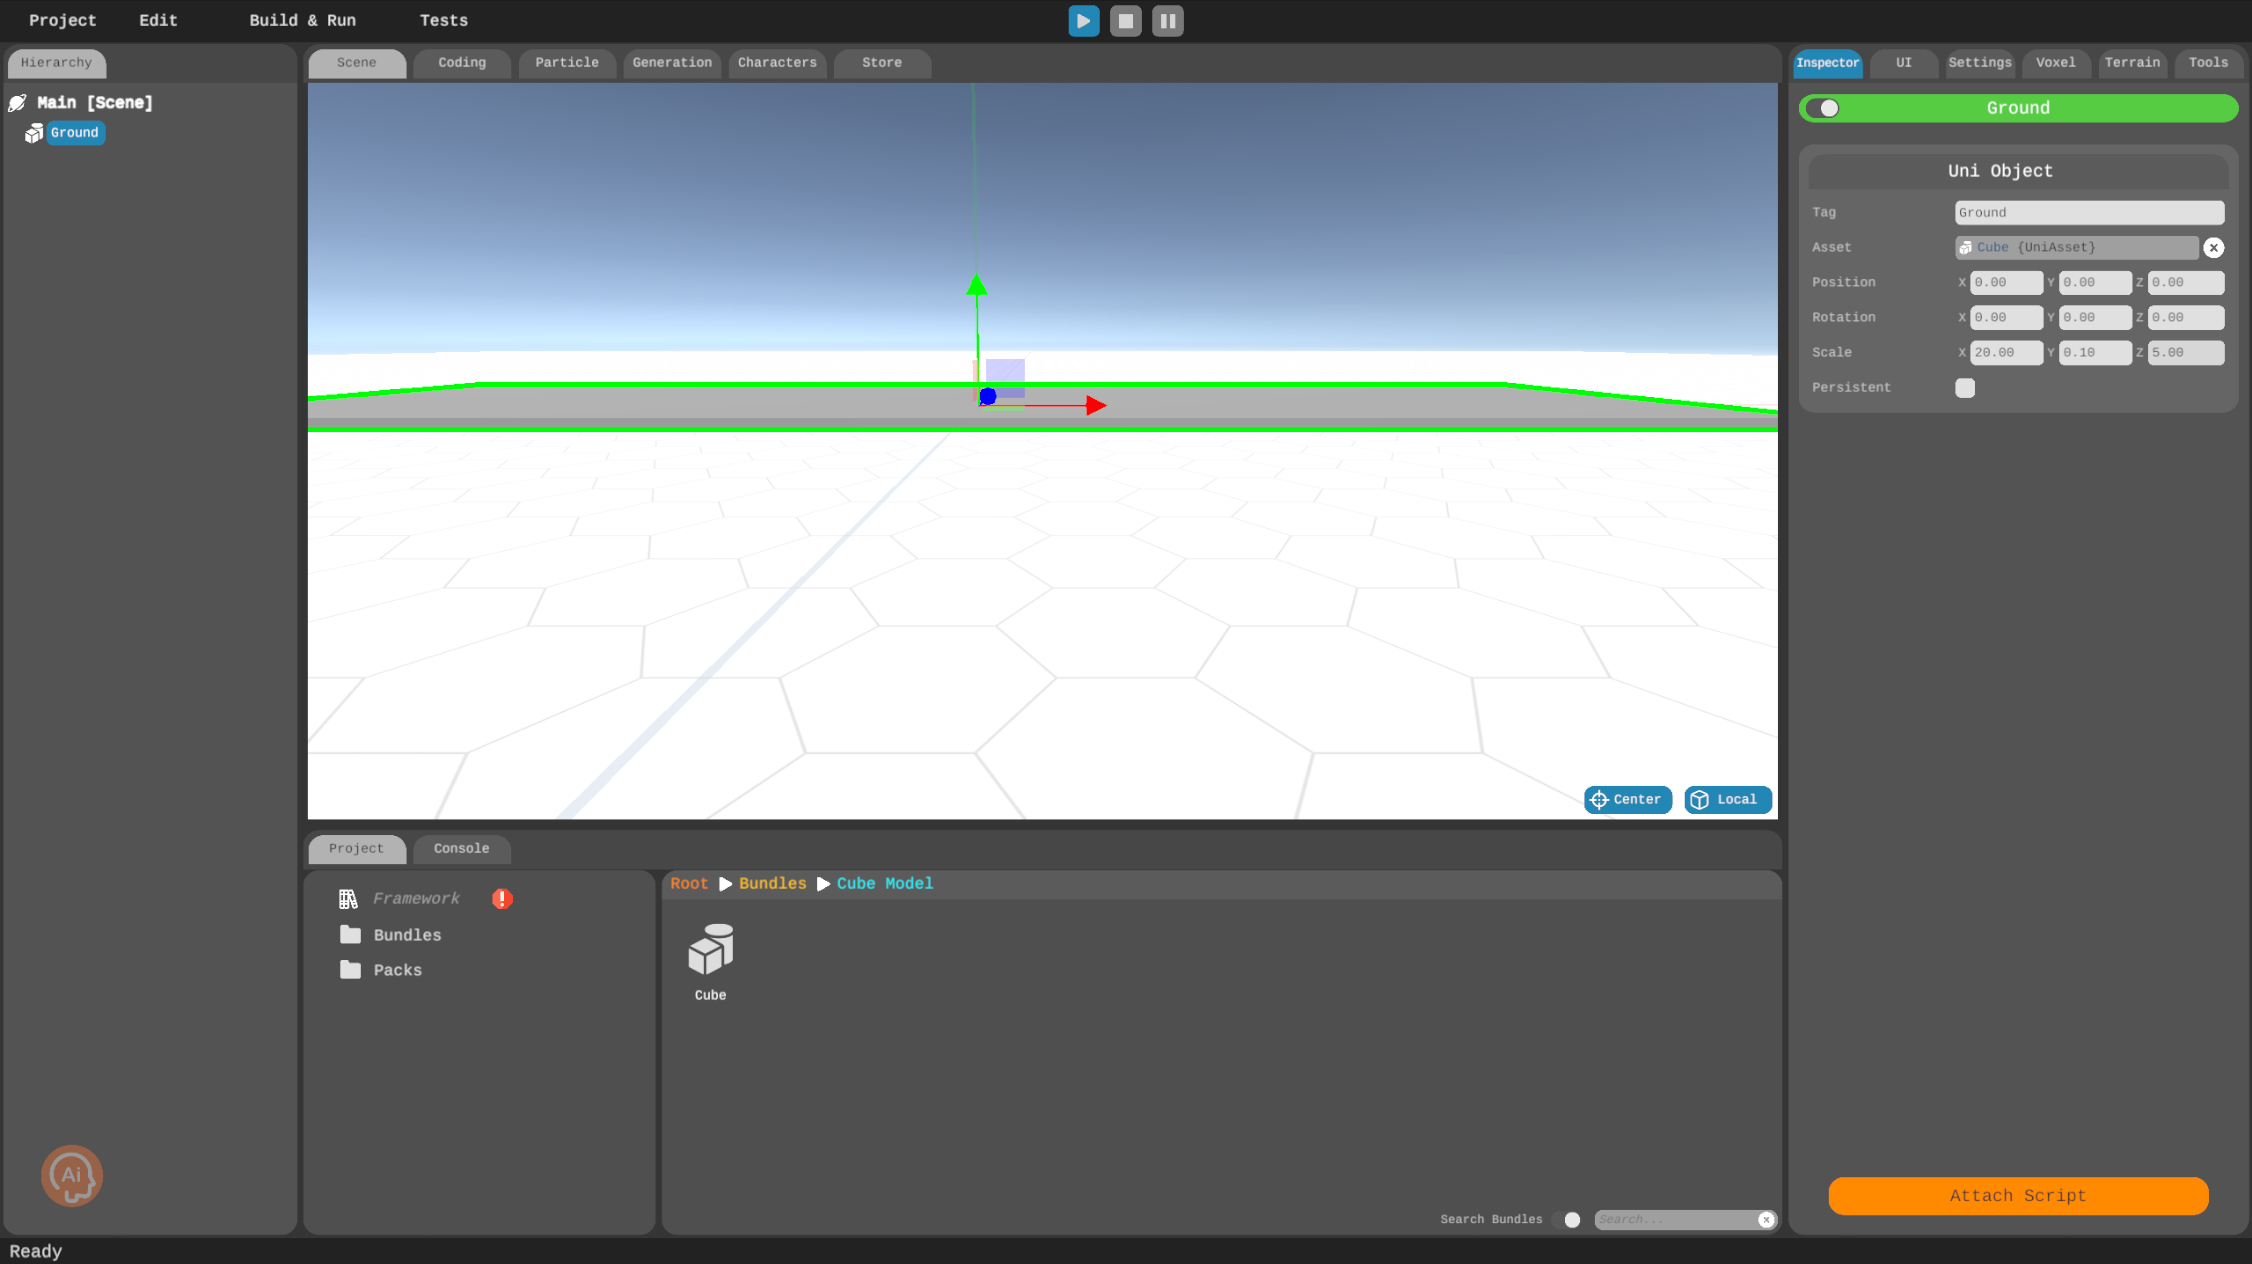 Ground object in action (it’s completely still, yes we are aware)
And finally click the “World” button in the Scene view to save and exit the scene. Now you have a ground for your rocks to bounce.
…and throw some rocks
It’s time to add some falling rocks to bring a bit of action! These rocks will drop from above, creating dynamic movement in the scene.
- In the Project component, right-click and select “Create folder”, and name the folder “Packs”
- Right-click on the newly created “Packs” folder, select “Create UniPack” and name it “Stone”
- Right-click on “Stone” and choose “Edit pack”
- Navigate to the “Bundles” folder, locate and double-click “Amorph” to open it
- Drag and drop “Amorph” onto the scene
- Set the scale of the “Amorph” model to 0.5, press CTRL + A to save your changes and then go back to the root of the “Stone” pack by clicking “Stone [Pack]” in the Hierarchy component
- Go to the root in the Project component, right-click and create a folder named “Scripts”
- Go into “Scripts”, right-click and create a new script called “Stone”
- Drag and drop this newly created “Stone” script onto the root of your “Stone” object
- Click “Attach script” and search for “Collider”, then select “Sphere collider” from the list
- In the Physics section in the Inspector component, set the Event receiver by dragging and dropping the “Stone” pack
- Click the three dots next to the receiver and select “Stone”
- And then finally lock the ZPosition in the Physics settings
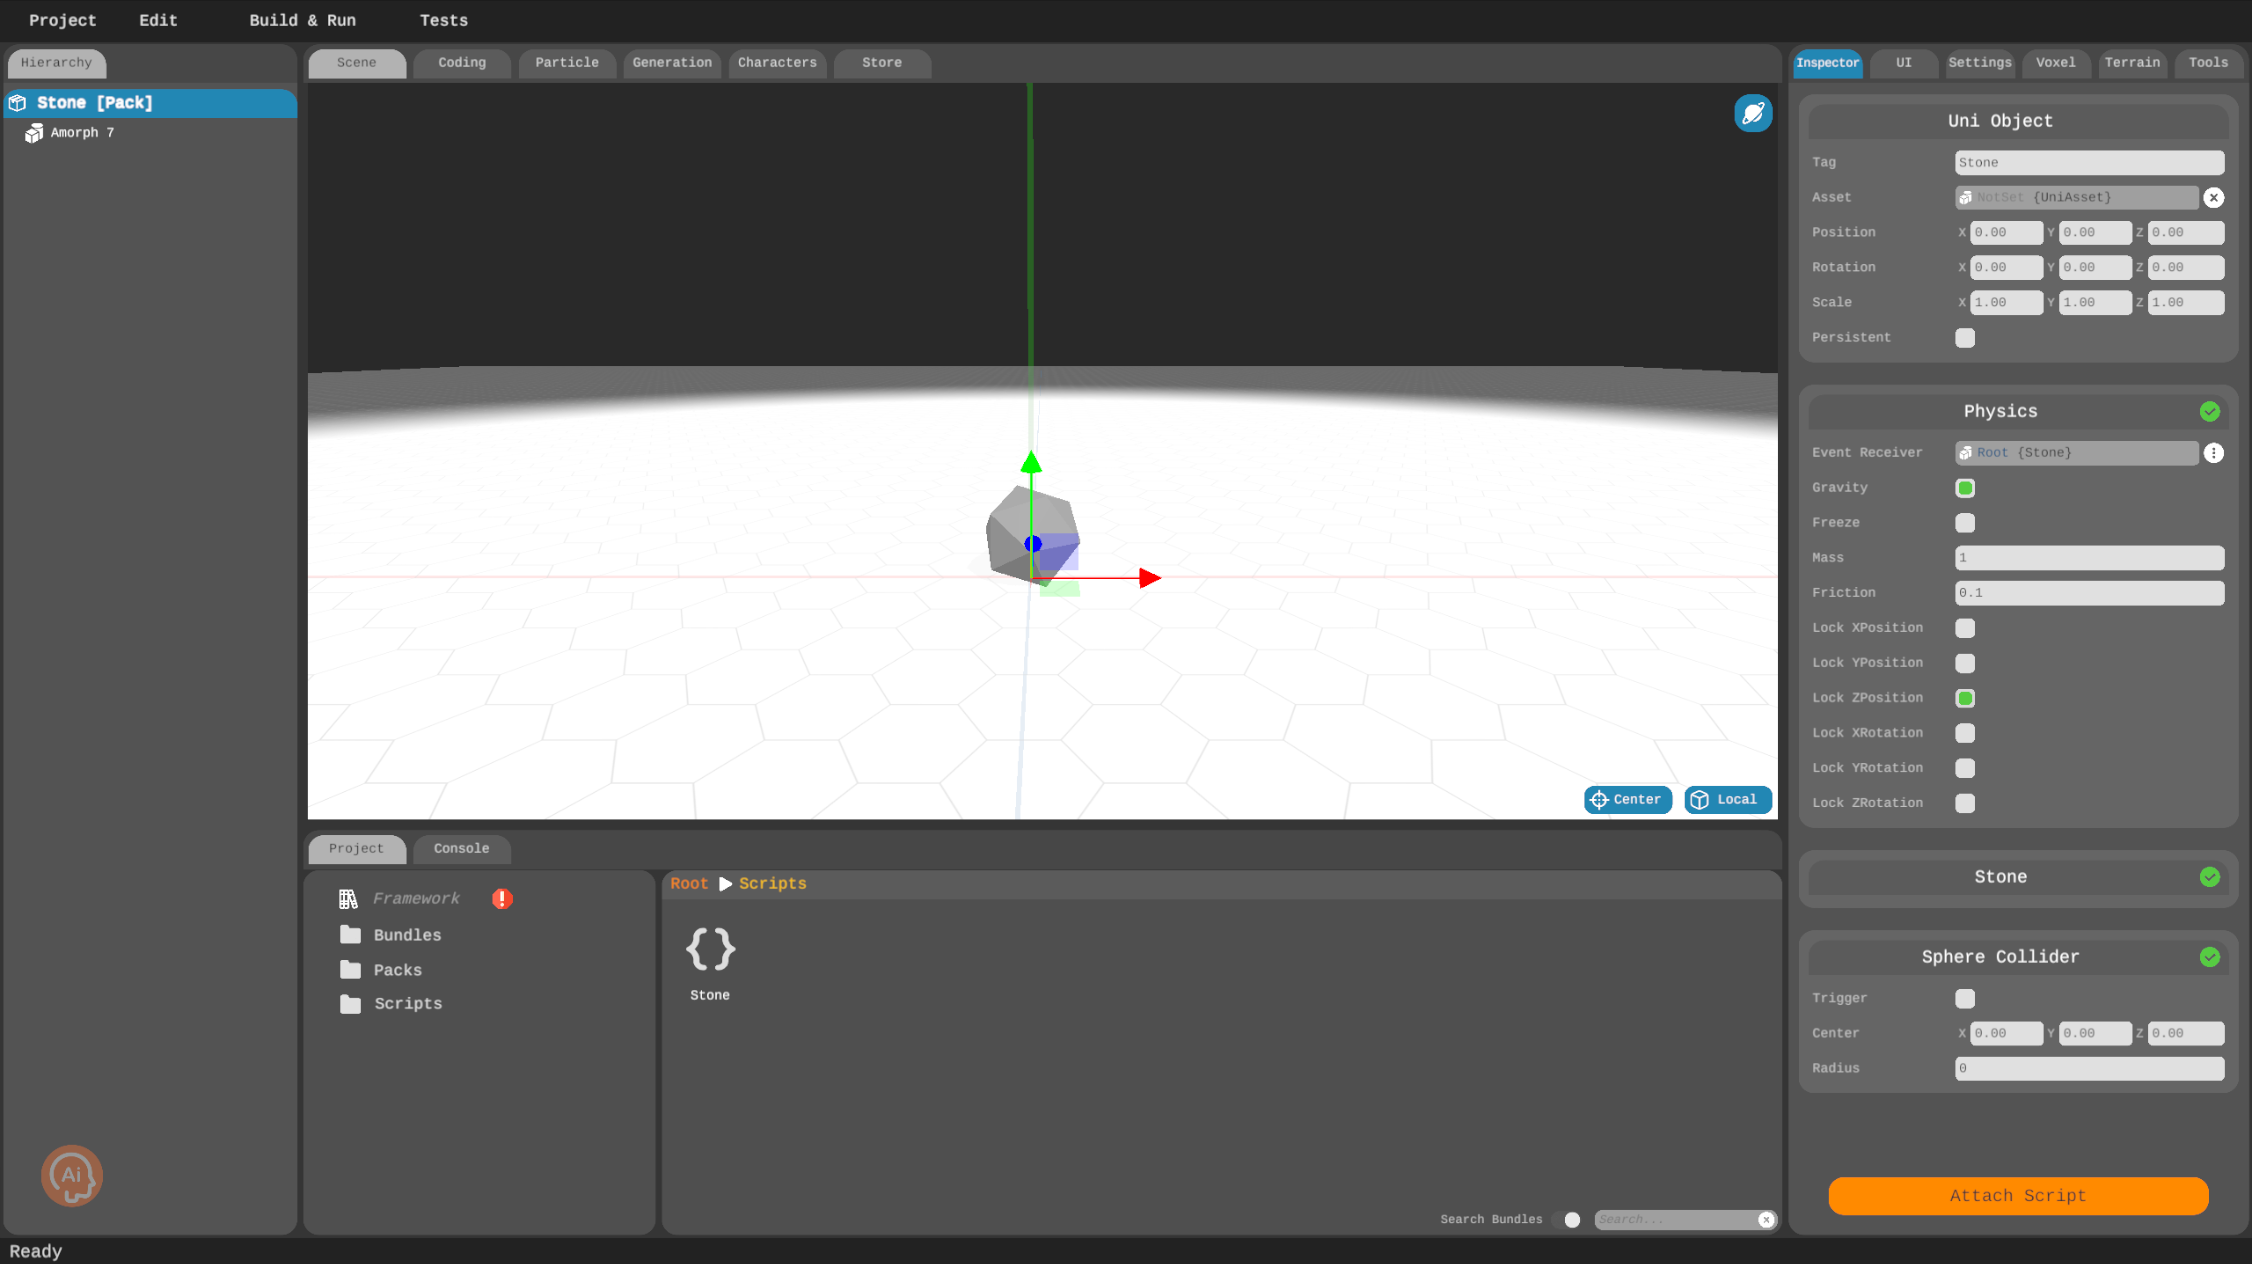 Looks like we couldn’t decide what to name it, rock or stone?
And just like you did before click the “World” button to exit the scene.
Main character syndrome
No game is complete without a player. We are not looking for a complex individual with a convoluted background though. All we need is a box to represent the win/lose state:
- Right-click in the “Packs” folder, select “Create UniPack” and name it “Player”
- Right-click on “Player” and choose “Edit pack”
- Navigate to the “Bundles” folder, locate and double-click “Cube Model” to open it.
- Drag and drop “Cube” onto the scene and rename it to “Player”
- Right-click in the hierarchy and create an empty game object
- Rename it to “FirePoint” and set its position to (0.00, 1.00, 0.00)
Before moving on to the next step, don’t forget to save and exit the scene via the “World” button.
Bite the bullet
We have a player but it’s defenseless against those pesky rocks! We need to arm them so that they can stand a fighting chance. A bullet will suffice for now:
- Right-click in the “Packs” folder, select “Create UniPack” and name it “Bullet”
- Right-click on “Bullet” and choose “Edit pack”
- Navigate to the “Bundles” folder, locate and double-click “Sphere Model” to open it.
- Drag and drop “Sphere” onto the scene and rename it to “Fire”
- Change its tag to “bullet” in the Inspector
- Set its position to (0.00, -0.10, 0.00) and scale to (0.20, 0.30, 0.20)
- Click “Attach script” and search for “Collider”, then select “Sphere collider” from the list
- Set the collider’s center to (0.00, 0.50, 0.00) and radius to 0.7
Whoa! Where did that come from?
Everything in the scene should come from somewhere, right? So let’s create the spawn points for them. This step will be the easiest:
- In the scene, right-click in Hierarchy, create an empty game object and rename it to “StoneSpawnPoint”
- Right-click in Hierarchy one more time, create another empty game object and rename it to “PlayerSpawnPoint”
Create scripts
And right after the easiest step, we’ll tackle the most complex one: making the whole game functional. For this, we will create code files called scripts. One script will control the movement of bullets that are fired by the player (Fire). Another one will control the player itself (Player). The falling rocks will move on their own thanks to the physics system but we will still need to split them when they are hit by the bullets and bounce them off the ground if they hit the ground without touching anything else (Stone). And finally we will use a script to put everything together like starting and ending the game (GameManager). Have a look at these scripts below:
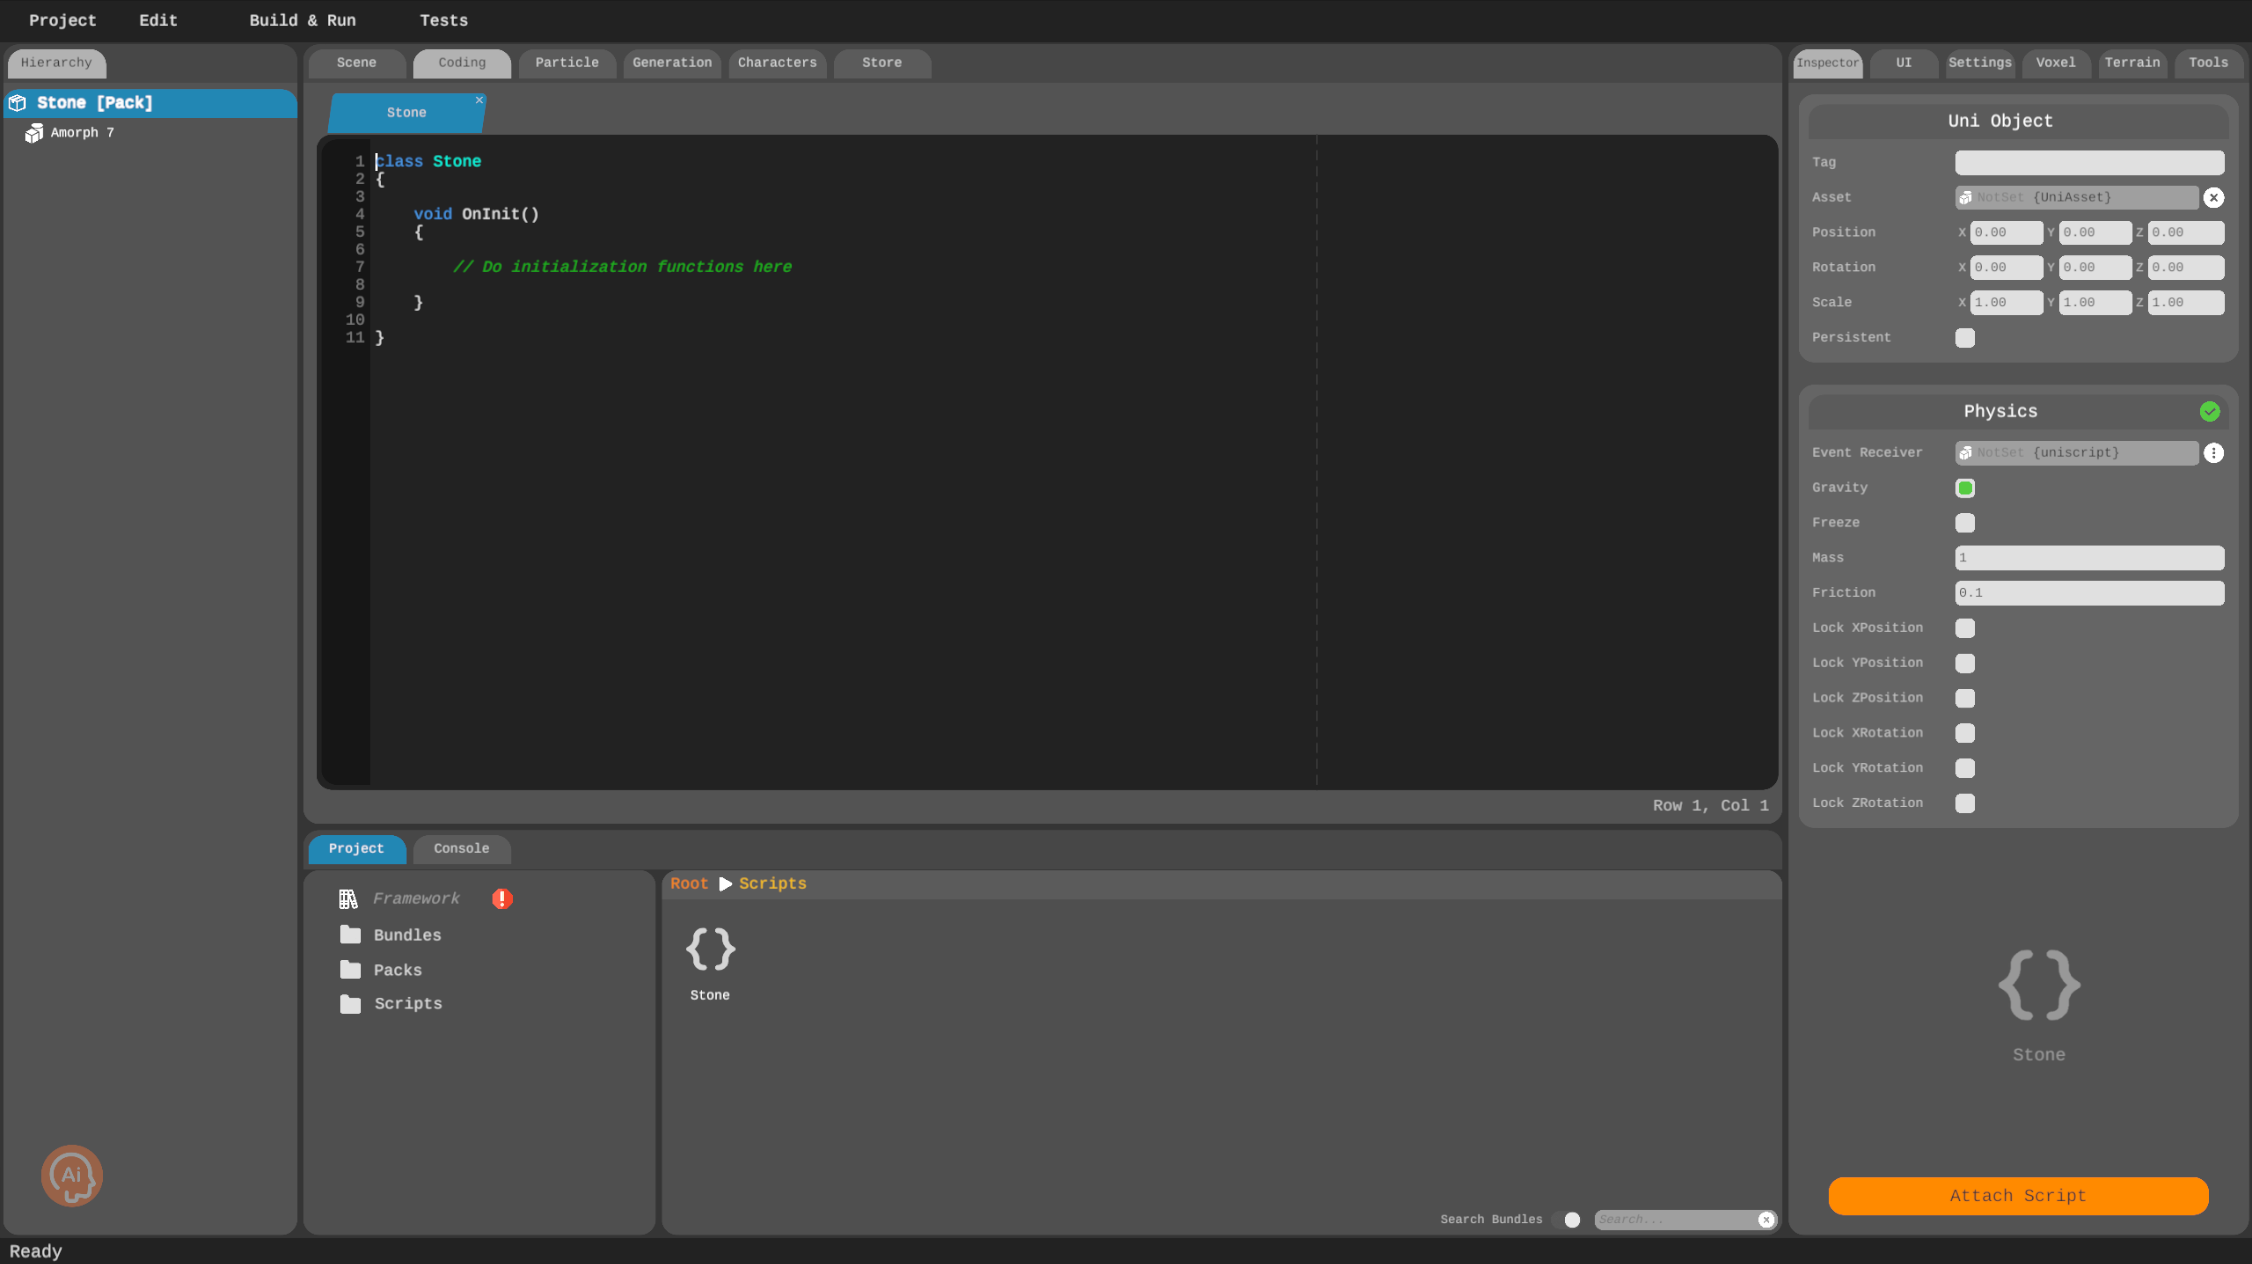 Creating your first script
Fire
class Fire
{
	float @speed = 5;
	UniObject uni;

	void OnInit()
	{
		uni = UniObjectUtil.GetUniObject(this);
	}

	void OnUpdate()
	{
		uni.Translate(0, speed * Time.DeltaTime(), 0);
	}
}
Player
using Universe.Framework;

class Player
{
	InputController @controller;
	UniAsset @crack;
	UniAsset @fire;
	float @range = 10;
	float @speed = 1;
	float @fireRate = 0.5;
	UniObject @firePoint;

	UniObject uni;
	Vector3 position;
	Vector3 axis;
	bool die;
	bool firing;
	float nextFire;
	GameManager gManager;

	void OnInit()
	{
		uni = UniObjectUtil.GetUniObject(this);
		controller.OnAxisEvent += OnAxis;
		controller.OnActionEvent += OnAction;
		position = new Vector3();
		axis = new Vector3();
	}

	void Initialize(GameManager manager)
	{
		gManager = manager;
	}

	void OnTriggerEnter(UniObject other)
	{
		if (!die && other.tag == "stone")
		{
			die = true;
			UniObjectUtil.InstantiateAndCallback(crack, "Dead", this, "OnDie", position);
		}
	}

	void OnDie(UniObject go, Vector3 pos)
	{
		gManager.Die();
		uni.Destroy();
		go.position = pos.ToVector();
	}

	void OnAxis(string panel, string sender, string action, vector3 direction)
	{
		axis.FromVector(direction);
	}

	void OnUpdate()
	{
		position.x += axis.x * speed * Time.DeltaTime();
		position.x = Math.Clamp(position.x, -range / 2, range / 2);
		uni.position = position.ToVector();

		float time = Time.GameTime();
		if (firing && time > nextFire)
		{
			nextFire = time + fireRate;
			Fire();
		}
	}

	void OnAction(string panel, string sender, string action, bool state, object data)
	{
		if (action == "Fire")
		{
			firing = state;
		}
	}

	void Fire()
	{
		UniObjectUtil.InstantiateAndCallback(fire, "Fire", this, "OnFire", null);
	}

	void OnFire(UniObject fireObject)
	{
		if (uni == null)
		{
			return;
		}

		fireObject.position = uni.position + firePoint.position;
	}

}
using Universe.Framework;

class Stone
{
	UniAsset @stone;
	int @bounce = 4;
	int @size = 3;

	UniObject uni;
	Physics physics;
	GameManager gManager;

	void OnInit()
	{
		uni = UniObjectUtil.GetUniObject(this);
		physics = uni.GetScript("Universe.Framework.Physics");
	}

	void Initialize(GameManager manager, int newSize, int direction)
	{
		gManager = manager;
		size = newSize;
		float scale = size * 0.4;
		physics.mass = size;
		uni.scale = VectorUtil.One() * scale;
		Vector3 rotation = new Vector3();
		rotation.New(Math.Random(0, 360), Math.Random(0, 360), Math.Random(0, 360));
		uni.rotation = rotation.ToVector();
		physics.AddForce(direction * 2, 6, 0, ForceMode.Impact);
	}

	void OnCollisionEnter(UniObject other)
	{
		switch(other.tag)
		{
			case "ground":
				Bounce();
			break;

			case "bullet":
				other.Destroy();
				Split();
			break;
		}
	}

	void Bounce()
	{
		bounce--;
		if (bounce == 0)
		{
			Destroy();
		}
		else
		{
			Vector3 velocity = new Vector3();
			velocity.FromVector(physics.GetVelocity());
			velocity.y = 15;
			physics.SetVelocity(velocity.ToVector());
		}
	}

	void Destroy()
	{
		uni.Destroy();
	}

	void Split()
	{
		if (gManager != null)
		{
			gManager.Score();
		}
		if (size > 1)
		{
			UniObjectUtil.InstantiateAndCallback(stone, "Stone", this, "OnInstantiate", -1);
			UniObjectUtil.InstantiateAndCallback(stone, "Stone", this, "OnInstantiate", 1);
			Utility.CallMethodDelayed(this, "DestroyLate", null, 0.1);
		}
		else
		{
			uni.Destroy();
		}
	}

	void OnInstantiate(UniObject newStone, int direction)
	{
		if (uni == null)
		{
			newStone.Destroy();
			return;
		}
		vector3 pos = uni.GetWorldPosition() + VectorUtil.Right() * 0.05 * size * direction;
		newStone.position = pos;

		Stone stoneScript = newStone.GetScript("Stone");
		stoneScript.Initialize(gManager, size - 1, direction);
	}

	void DestroyLate()
	{
		uni.Destroy();
	}

}
GameManager
using Universe.Framework;

class GameManager
{
	UIPanel @gameUI;
	UIPanel @controlsUI;
	UIPanel @gameOverUI;
	UIPanel @startUI;
	InputController @controller;
	BoxCollider @groundCollider;
	UniObject @playerSpawnPos;
	UniObject @stoneSpawnPos;
	float @spawnRange = 14;
	float @stoneSpawnRate = 1;
	int @stoneSize = 4;
	UniAsset @playerPack;
	UniAsset @stonePack;

	int score;
	bool isGameOver = true;
	float nextSpawn;
	Player player;

	void OnStart()
	{
		controller.OnActionEvent += OnAction;
	}

	void OnUpdate()
	{
		float time = Time.GameTime();
		if (!isGameOver && time > nextSpawn)
		{
			nextSpawn = time + stoneSpawnRate;
			SpawnStone();
		}
	}

	void OnAction (string panel, string sender, string action, bool state, object data)
	{
		if (state)
		{
			return;
		}

		switch(action)
		{
			case "Start":
			StartGame();
			break;
		}
	}

	void StartGame()
	{
		UniObjectUtil.SetScriptActivation(groundCollider, true);
		SpawnPlayer();
		gameOverUI.Close();
		startUI.Close();
		controlsUI.Open(false);
		isGameOver = false;
		score = 0;
		UpdateScore();
	}

	void SpawnStone()
	{
		UniObjectUtil.InstantiateAndCallback(stonePack, "Stone", this, "OnStone", null);
	}

	void SpawnPlayer()
	{
		UniObjectUtil.InstantiateAndCallback(playerPack, "Player", this, "OnSpawn", null);
	}

	void OnStone(UniObject uni)
	{
		if (uni == null)
		{
			return;
		}
		Vector3 position = new Vector3();
		position.FromVector(stoneSpawnPos.position);
		position.x = Math.Random(-spawnRange, spawnRange);
		uni.position = position.ToVector();
		Stone stone = uni.GetScript("Stone");
		stone.Initialize(this, stoneSize, 0);
	}

	void OnSpawn(UniObject uni)
	{
		if (uni == null)
		{
			return;
		}
		uni.position = playerSpawnPos.position;
		player = uni.GetScript("Player");
		player.Initialize(this);
	}

	void Die()
	{
		isGameOver = true;
		controlsUI.Close();
		gameOverUI.Open(false);
		UniObjectUtil.SetScriptActivation(groundCollider, false);
		Utility.CallMethodDelayed(this, "ShowStart", null, 2);
	}

	void ShowStart()
	{
		startUI.Open(false);
	}

	void Score()
	{
		score++;
		UpdateScore();
	}

	void UpdateScore()
	{
		gameUI.SetItemValue("Score", score + "");
	}
}
Interacting with the user
If the player is not interacting with the game, is it really a game? Not so much, so let’s add the UI then! We’ll start with the controls, and then move onto the menus.
Controls
We need two things to control the player: a button to fire, and a joystick to move around. Uni-verse has pre-made components for both:
- In the Project window, right-click and create a new folder named “UI”
- Right-click on the UI folder and select “New UI”, then name it “UI”
- Right-click on “UI” and select “Edit UI”
- Click “Add panel” and name it “Controls”
- Drag and drop a Joystick onto the panel, name it “Move,” and position it in the left bottom corner (150, 100) and resize it to (300, 300).
- Drag and drop a Button onto the panel, name it “Fire,” and position it in the right bottom corner (-150, 100) and resize it to (300, 300).
- In the Action tab, add actions: Left: A, left arrow Right: D, right arrow Fire: Space Start: Return
- Select the joystick and assign the corresponding actions
- Select the button and assign the “Fire” action
- Go back to UI
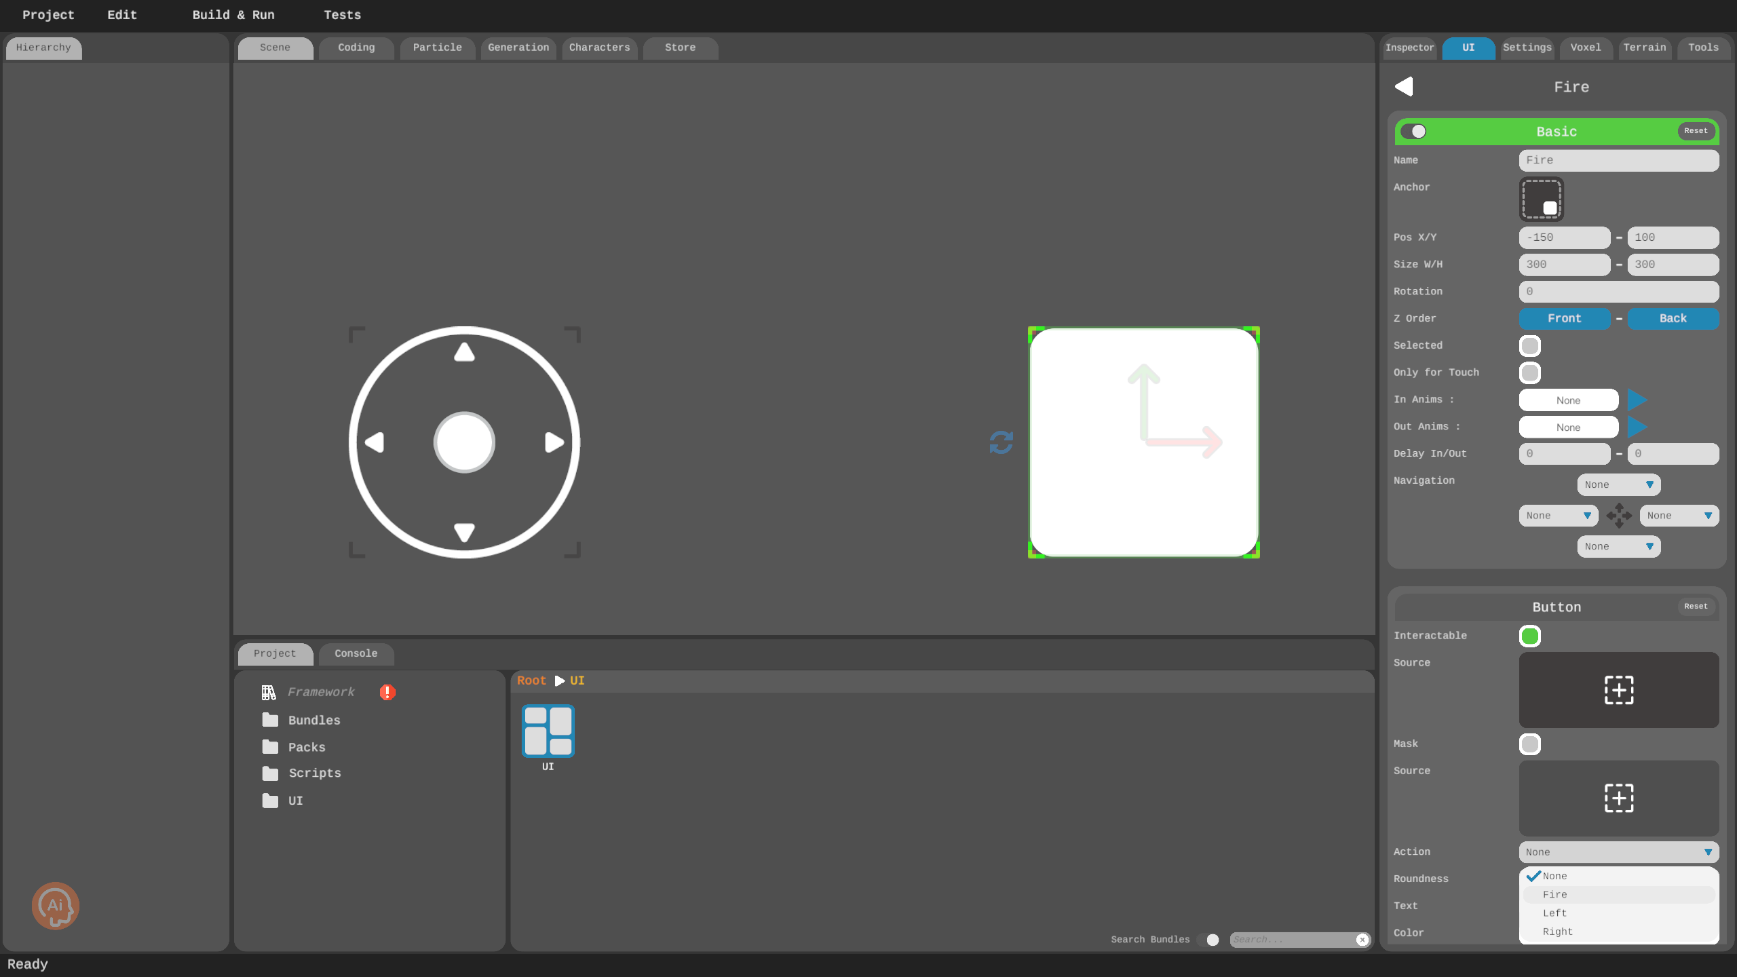 This is how your UI should look like after creating the fire button and the joystick
Start
We’ll need 3 basic UI panels for the whole game. One for starting the game…
- Click “Add panel” and name it “Start”
- Drag and drop a button onto the panel
- Set its anchor to bottom-mid, position to (0, 190) and size to (300, 100)
- Set “In Anims” to “MoveFromDownMid” and “Out Anims” to “MoveToDownFar” (you can actually choose any animation you like, but for the purposes of this tutorial we’ll stick with these)
- Set “Delay” to (1, 0)
- Set its text to “Start” and action to “Start”
…one for keeping the score while playing…
- Click “Add panel” and name it “Game”
- Drag and drop a text field onto the panel and name it to “Score”
- Set its anchor to top-right, position to (-50, -50) and size to (200, 80)
- Set “In Anims” to “MoveFromRightMid” (again, feel free to explore if you are a little adventurous)
- Set its text to “0” and alignment to right
…and one for when the game is finally over:
- Click “Add panel” and name it “Game Over”
- Drag and drop a text field onto the panel
- Set its position to (0, 95) and size to (400, 100)
- Set “In Anims” to “LoopHorizontal”
- Set its text to “Game Over”, text size to 100
With these steps completed, you’ve set up the foundational elements of your project. You can now hit play and enjoy your first game in Uni-verse Studio! It may look and play rather rudimentary but this is just a start! With Uni-verse Studio and a little bit of imagination, you can create everything from a simple hyper-casual to a multiplayer first person shooter!